FREQUENTLY ASKED QUESTIONS (FAQ)
Looking for answers to frequently asked questions related to Printix Secure Cloud Print Management Software?
Find relevant and up-to-date information, links to diagrams and manuals with easy-to-follow step-by-step explanations.
How do I get started with the Printix trial?
Please refer to Getting Started in the Printix Administrator Manual which explains how you:
- Sign up for the product.
- Complete the setup.
- Print and release documents via your phone, tablet or computer.
The free 1-month trial gives access to all features. Before the trial ends, enter a credit card to start the subscription.
How to Build a new site with Printix Cloud?
This describes a “green field” scenario, where you want to have Printix installed and configured before users move into the new office/site. Follow the steps below to build your print infrastructure.
Requirements:
- You should be connected to the network at the new site.
- Printers are powered on and on the network.
- Make the recommended: Implementation setup.
Step 1: Install
Download the Printix Client software and install it on a computer at the new site. The computer should run the same Windows/macOS editions the users will be using, for example Windows 10 ×64.
- Printers are discovered and registered in Printix Cloud.
Step 2: Set up print queues
Open the Printers page to see Printer properties and Print queue properties. If not all of your printers are listed on the Printers page, then add the missing printers.
- Optionally rename printers and print queues.
- Refine the print queue setup by adding print drivers and make print driver configurations to configure Installable Options (such as Paper trays, Duplexer, Staple, Hole punch, and Output bins), and for example Form to tray Assignment.
- For each of the additional Windows/macOS editions to be used in the organization, for example Windows 7 ×64, install Printix Client and add print drivers and make print driver configurations.
- Test that printing via the added print queues works as intended on the Windows/macOS editions to be used.
Step 3: Deploy Printix Client to computers
- Use your preferred method to deploy Printix Client, such as Microsoft Endpoint Manager, and get users to print with Printix.
- If users Sign in with Microsoft you should Accept Printix for all users.
How to sign in to Printix Client via browser window?
With the introduction of Printix Client version 1.3.619.0, Sign in will happen via a browser window. The Sign in page will open in the computer’s default browser as a new tab.
The new method reduces the risk of sign in issues and allows for easier troubleshooting.
New method

Old method
In previous versions of Printix Client, Sign in would happen via the Printix Client window showing a web page presented by the Windows Embedded web browser. The old embedded method could be prevented from working if the Security settings for the Microsoft web browser (Edge or Internet Explorer) were configured in a special way.

How to start a trial on a computer?
Requirements:
- You should be connected to the network you want to use Printix on, for example, the network at the office.
- Your computer must have access to at least one printer on the network and with at least one print queue installed, to experience the various printing features. If you intend to install on a fresh virtual machine, you should add a printer first, so it can become managed by Printix.
Step 1: Install
- Download Printix Client. Open and run the downloaded file to install on your Windows
 or Mac
  computer.
 - Sign in to Printix Client. This is automatic if your Windows 10 computer is Azure AD joined.
- If you see Sign in with Microsoft, select this and sign in with your work account.
- If you see Sign in with Google, select this and sign in with your Google Workspace account (not @gmail.com).
- Otherwise, enter the Email and Password you used when you registered. If you were not asked to sign in, then sign in via the Printix Client menu.
- If you have issues with Sign in to Printix Client, then please read: Sign in issues.
- Discover printers. Please wait a couple of minutes while Printix Client discovers your printers.
If it reports “Found no new printers” , it could be because your printers are on a different subnet than your computer. On the Printers page select Add printer
  to manually add a printer from that subnet, and then do another discovery to find additional printers on that subnet.
Step 2: Start printing
Having installed Printix Client, you can now print to the Printix managed printers and check out the many features that will make office printing convenient, secure and easy to manage. But first, let us check out how you can print as usual.
- Open the item you want to print. Select Print on the File menu.
- You will notice that nothing has changed, except for the three letters (ASD, BNM, …) at the end of the printer name, which indicates that these printers are now managed by Printix. And apart from the Printix Anywhere printer, you have the exact same printers available to you as you did before the installation.
- Identify a Printix printer, select it, select Print.
Optionally try the print methods and consider adding 2-3 users.
Can Printix deploy printers to users?
Yes, Printix can be used to deploy printers to users. In a small company, you can open Printix Administrator and check the printer property Automatically add printer for everyone. The corresponding print queue will be added automatically on all users’ computers running Printix Client. This is a very efficient method of deploying all printers on all computers.
If you use Azure Active Directory (AD) or Google G Suite you can use groups to control access to printers and deploy printers based on users’ membership of groups. If you enable dynamic memberships in Azure AD, you can automate the enrollment and the setup of printing for new employees.
How to Print with Printix?
Having installed Printix Client you can print to the Printix printers.
- On your computer open the item you want to print.
- Select Print on the File menu.
- Identify a Printix printer, select it, and select Print.
- I do not see my printer – How do I add the printer?
See also:
- How to print from Android phone and tablet.
- How to print from iPhone and iPad.
- I am using Printix Chromebook – How to print from Chrome.
Printix printers
- ASD, BNM, …
A three-letter printer ID is part of the printer’s name. Example: Reception ASD. If you do not see your printer with a three-letter ID, then use Printix Client to add the printer.- You can Print directly (as usual), or.
- You can choose to Print later and subsequently release the document at the particular printer via your phone.
See the steps in the: Printix User Manual.
- Printix Anywhere printer

A print queue named Printix Anywhere on your computer.- Print to the Printix Anywhere print queue and subsequently release the document at any Printix (ASD, BNM, …) printer via your phone.
See the steps in the: Printix User Manual.
- Print to the Printix Anywhere print queue and subsequently release the document at any Printix (ASD, BNM, …) printer via your phone.
Print methods
Document is printed immediately and directly at the selected printer.
- The document is processed using the matching print driver, with full control of finishing options, for example.
Print later

The perfect choice if you need to print confidential documents with finishing options and want to ensure your documents print exactly as you expect them to.
- The document can be released to the printer it was printed to.
- The document is processed using the matching print driver, with full control of finishing options, for example.
See the steps in the: Printix User Manual.
Print anywhere
When you submit a document to the Printix Anywhere print queue you can roam between printers and release the document at the printer you choose.
- The document can be released to the printer (ASD, BNM, …) you choose.
- If the release printer support PDF, the document is sent directly to the printer.
- If the release printer does not support PDF, the document is processed using a matching print driver.
See the steps in the: Printix User Manual.
Reprint

From your phone you can reprint those of your documents that were deleted or printed within the previous 12 hours.
- Even documents you printed directly to the printer, can be reprinted without going back to your computer and submit them again.
See the steps in the: Printix User Manual.
How do I integrate with Azure Active Directory?
If your cloud strategy already involves Microsoft Azure Active Directory, Microsoft Intune, perhaps as part of Microsoft Enterprise Mobility Suite (EMS), then you can add Printix as the missing link and thereby eliminate the use of print servers and move print management 100% to the cloud.
- Microsoft integration
- Printix supports single sign-on with Microsoft Entra ID
- Printix can be deployed with Microsoft Intune
- Printix can use groups to control access to printers and deploy printers based on users’ membership of Entra ID groups.
How to Migrate multiple sites to Printix Cloud?
Migrating multiple sites, like branch offices and campuses.
Prerequisites:
- Printix is already deployed at the first site.
Step 1: Add site
Install Printix Client on a computer at the site you want to add.
- If you can remotely sign in to the computer as administrator, then you can also install Printix Client. Sign in to Printix Client.
- Alternatively use Add user to invite a user at the site you want to add. If possible call and notify the user in advance. Wait for this user to install and sign in to Printix Client. You can also use your own email account to send an explanatory message that includes a link to the Printix Client download page. Example: acme.printix.net/download
The user’s computer appears on the Computers page as being on an Unknown network.
- Use Add network and give the network a descriptive name.
- Use Add to network to add the gateway (LAN and/or Wi-Fi) of the computer to the network.
- Open the Computer properties page of the computer and select Discover printers.
If there are additional sites, then install on these also, to make the copy of the print infrastructure.
Step 2: Deploy Printix Client to computers
- Use your preferred method to deploy Printix Client, such as Microsoft Endpoint Manager, and get users to print with Printix.
- If users Sign in with Microsoft you should Accept Printix for all users.
How to Migrate print server to Printix Cloud?
- Step 1: Install Printix Client on the print server
- Step 2: Deploy Printix Client to computers
- Step 3: Remove print server
Requirements:
- You have access to an administrative account and can sign in to the print servers.
- Make the recommended: Implementation setup.
Step 1: Install Printix Client on the print server
When you download the Printix Client software and install it on the print server, we make a copy of the current print environment details in Printix Cloud. Rest assured, we do not change or delete anything on the print server.
- The Microsoft web browser (Edge or Internet Explorer) Security settings may obstruct the download of the Printix Client software. To workaround this you may want to download it on another computer (without installing) and then copy it to the print server, so you can run it from there.
- If you have issues with Sign in to Printix Client, then please read: Sign in issues.
During the discovery process, we automatically detect and register printers, print queues and drivers in Printix Cloud. At the same time, a Network1 is created with the gateway of the print server’s network adapter.
If there are additional print servers, install Printix Client on each of these, to make the copy of your print infrastructure as complete as possible. Open the Computer properties page of the print server and select Discover printers.
- If not all of your printers are listed on the Printers page, then add the missing printers.
- Optionally rename printers and print queues.
Step 2: Deploy Printix Client to computers
- Use your preferred method to deploy Printix Client, such as Microsoft Endpoint Manager.
- If users Sign in with Microsoft you should Accept Printix for all users.
Step 3: Remove print server
Before removing the print server, you should verify that the print server’s shared printers can be paused without users complaining. You should also verify that the server does not have additional roles, such as Domain Controller, File Server, etc.
Take the server offline. Unplug the network cable and leave it that way for a week or so: if nobody cries it’s safe to decommission the print server.
You are now on Printix – what has changed?
The user experience for printing is the same. Only the printer name is enhanced with a three-letter printer ID to make it easy to search for and identify printers. From an IT management perspective, however, cloud deployment means less ongoing management since infrastructure is now managed from the cloud.
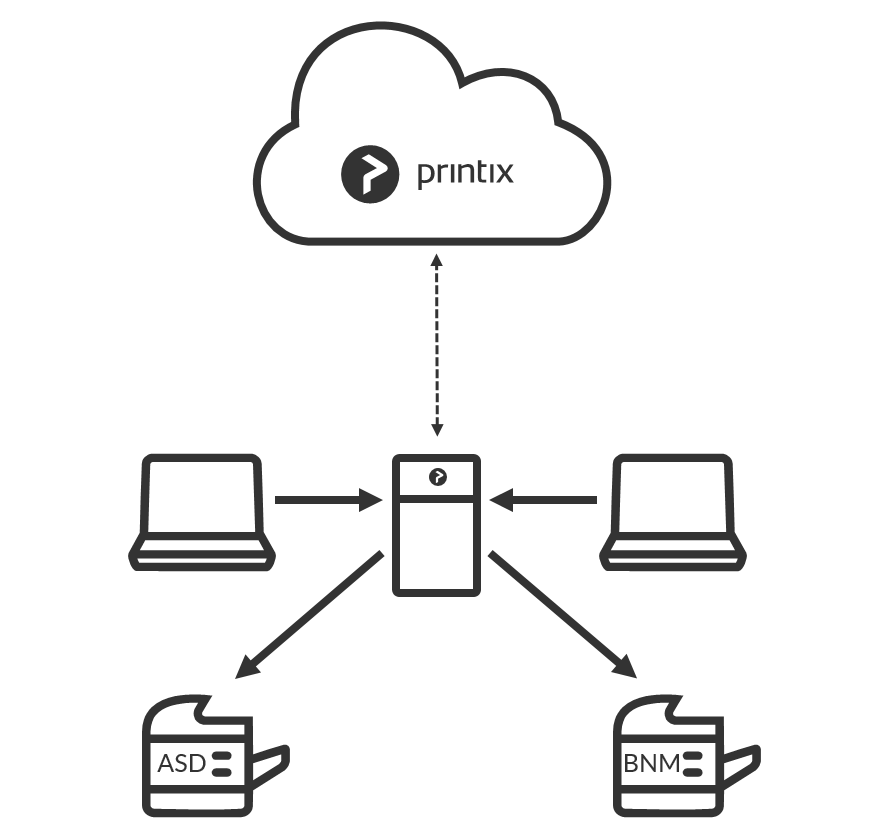
How Printix Print Management Software works?
Your Printix Cloud Print Management Service is established by deploying Printix Client, our small piece of software, on your computers (Windows and Mac).
Print driver management
Any printer discovered in your network is presented to you in our web interface Printix Administrator. Your configuration data is stored securely in your Printix Home in the cloud, and so are print drivers that Printix Client uploads to your Printix driver store. Your Printix Client is built to only work with your Printix Home and users are required to sign in before use.
Print-ready convenience
- Automatically Add and Remove print queues.
- Add, Modify and Delete Print driver configurations to configure:
- Device settings (Paper trays, Duplexer, Stapler, Hole punch, and Output bins).
- Printing defaults (Finishing options, Print 2-sided, and Print in black).
- Set default printer.
- Remotely Add, Update and Delete Printix managed print queues.
- Use Groups to deploy and grant exclusive access to printers based on users’ group membership.
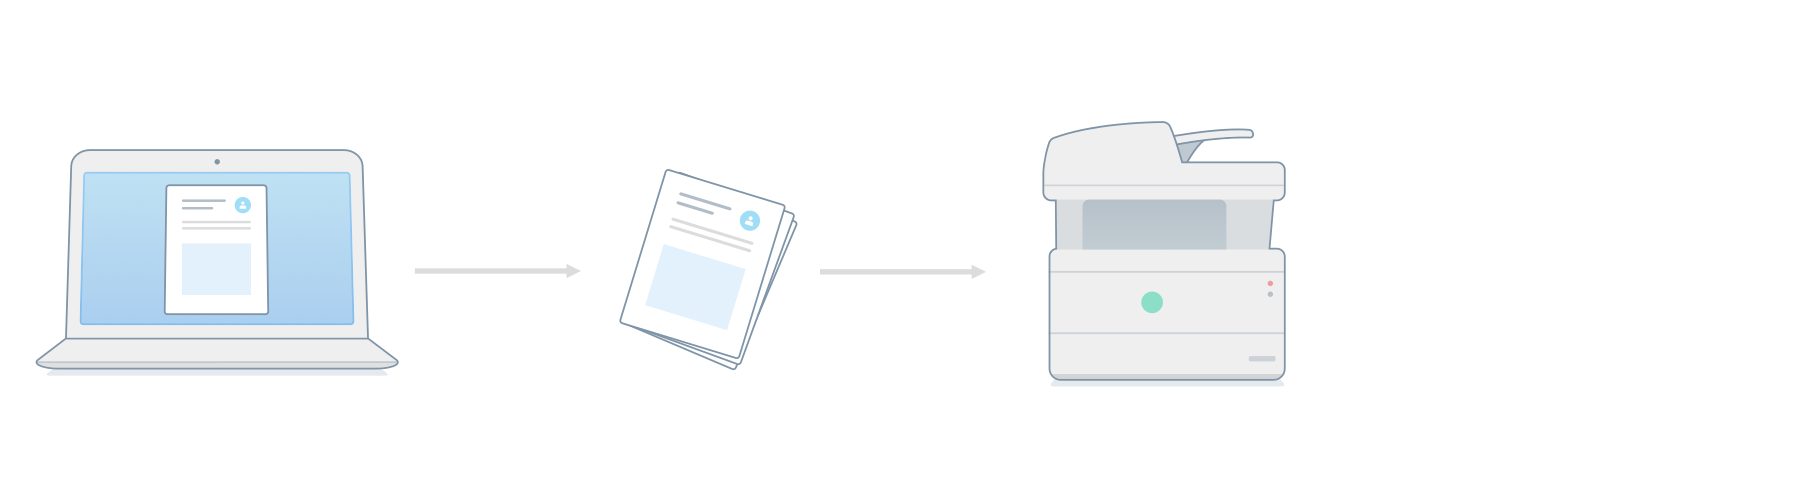
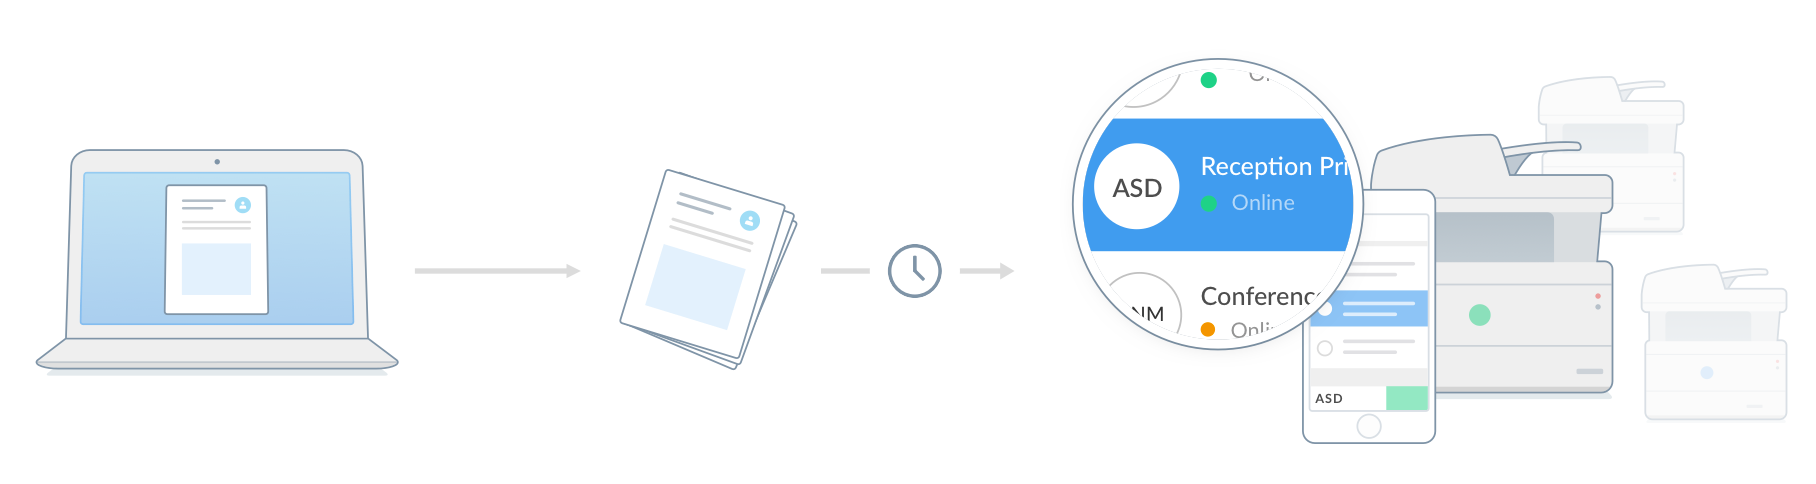
Printing
The secure and flexible methods of Printing with Printix are achieved by having Printix Client temporarily store print data encrypted on the computer and informing Printix Cloud about the document. Users can print directly (as usual) or they can print securely and release documents from Printix App on their phone, tablet and computer. On printers with Printix Go users can sign in with card or ID code and release their documents. Pending documents can also be stored in your own secure cloud storage (Azure Blob Storage or Google Cloud Storage).
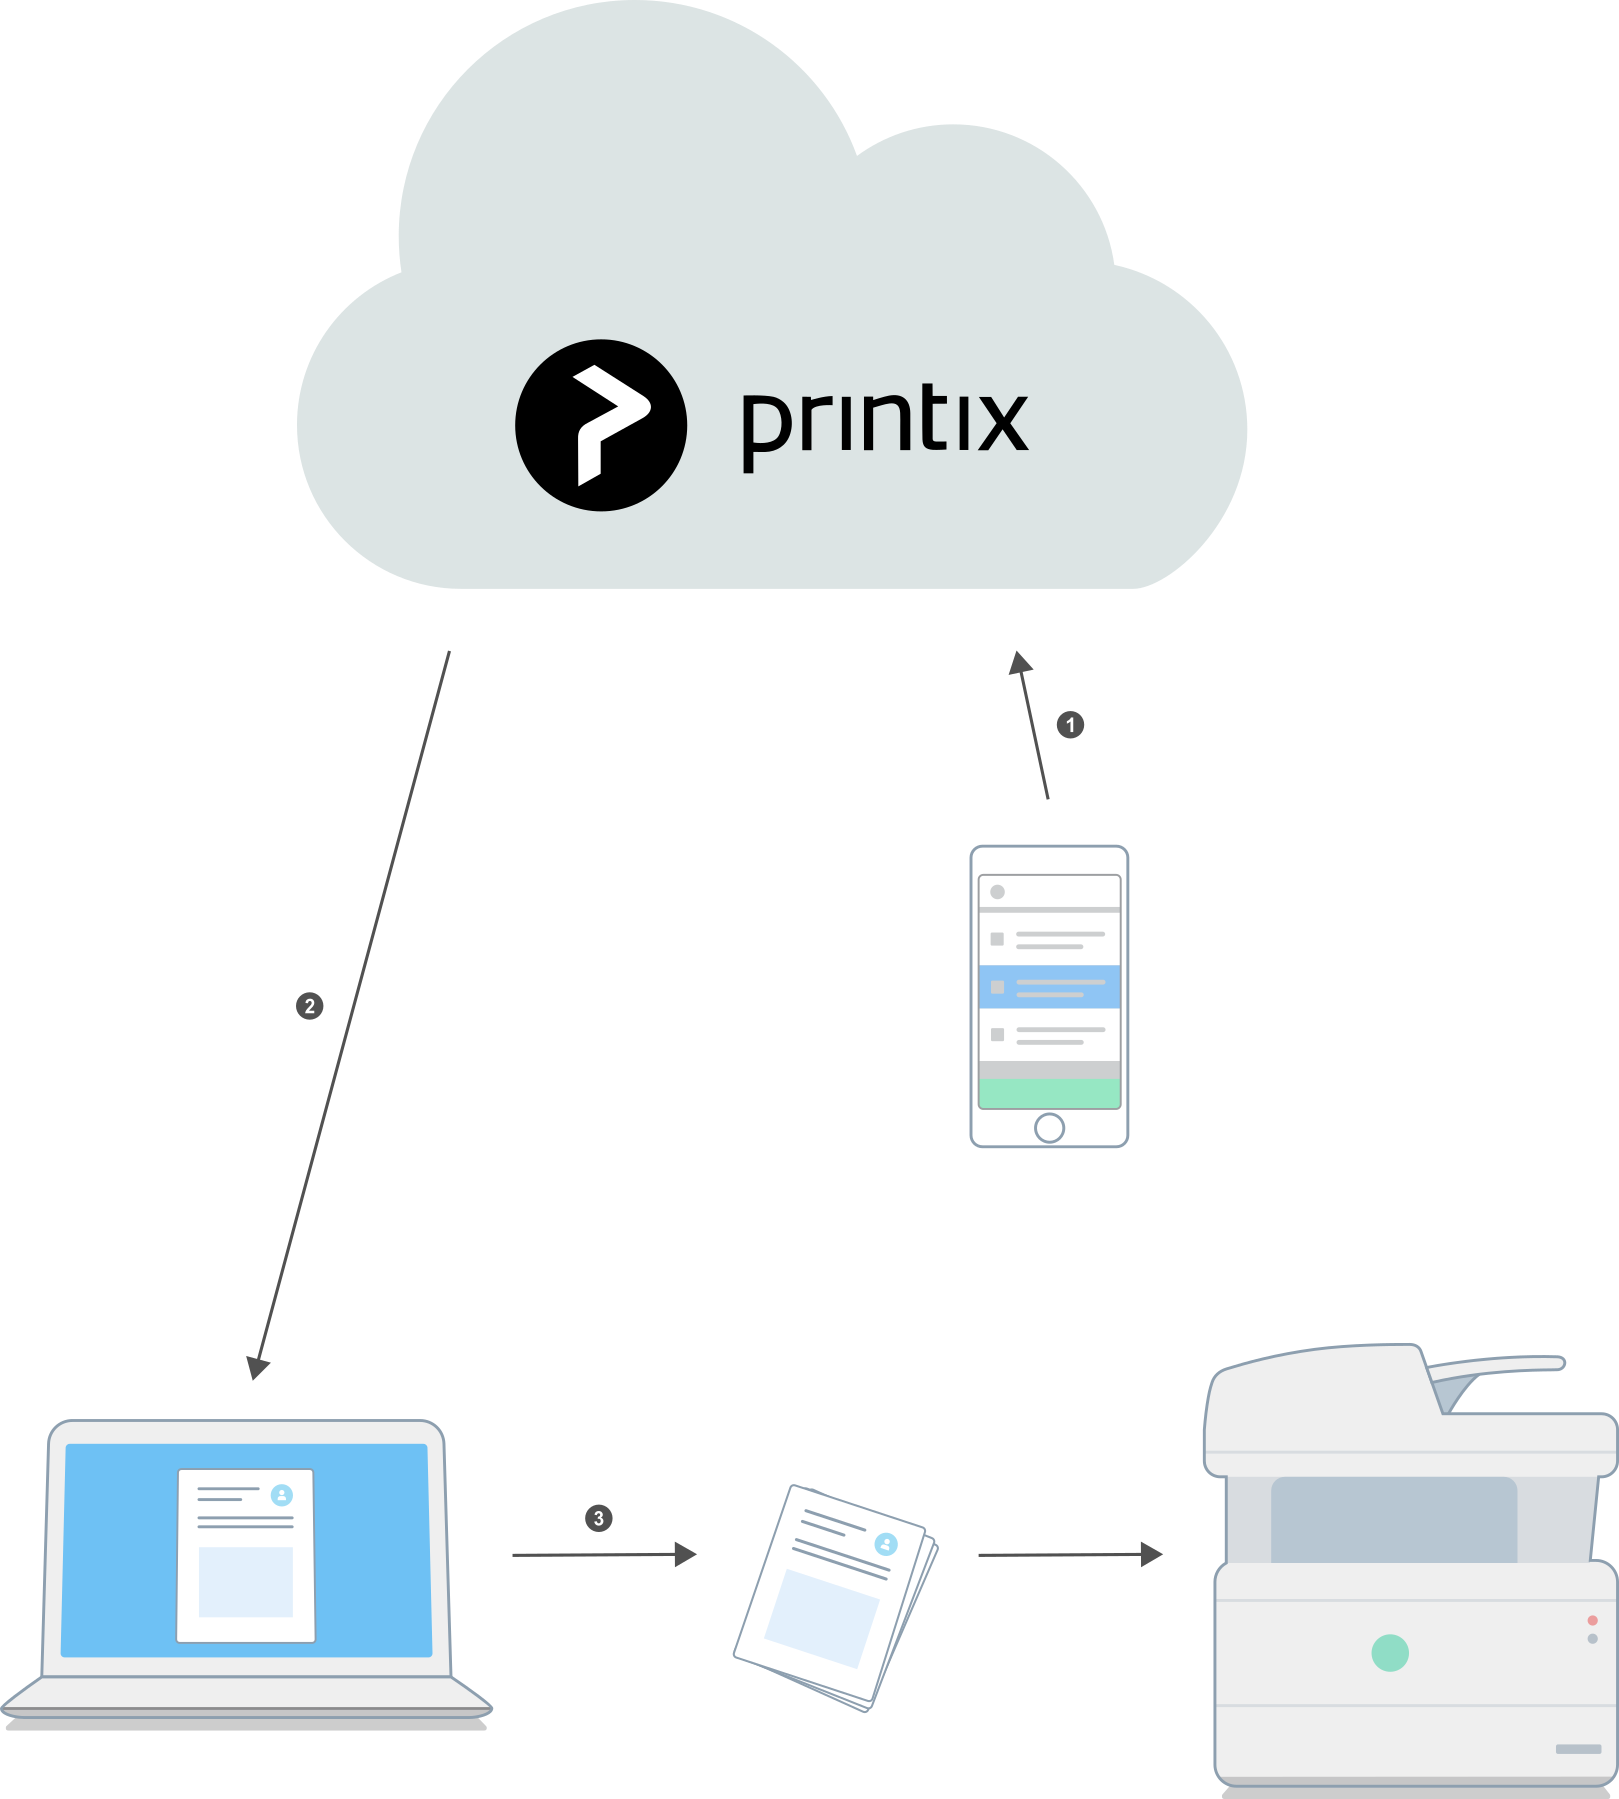
Behind the scenes the process of releasing the document is as follows:
- Printix App sends a release-document request to Printix Cloud.
The user’s record of pending documents is consulted to determine where the document is stored. - Printix Cloud sends the release-document request to the Printix Client on the user’s computer.
- Printix Client on the user’s computer decrypts the print data and sends it to the designated printer.
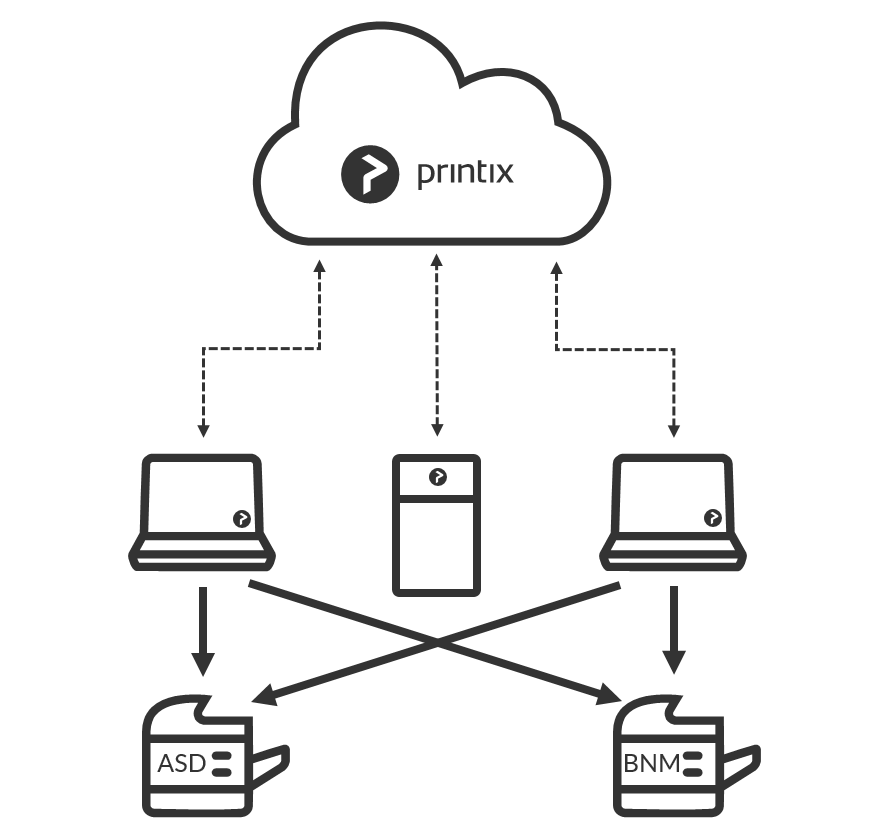
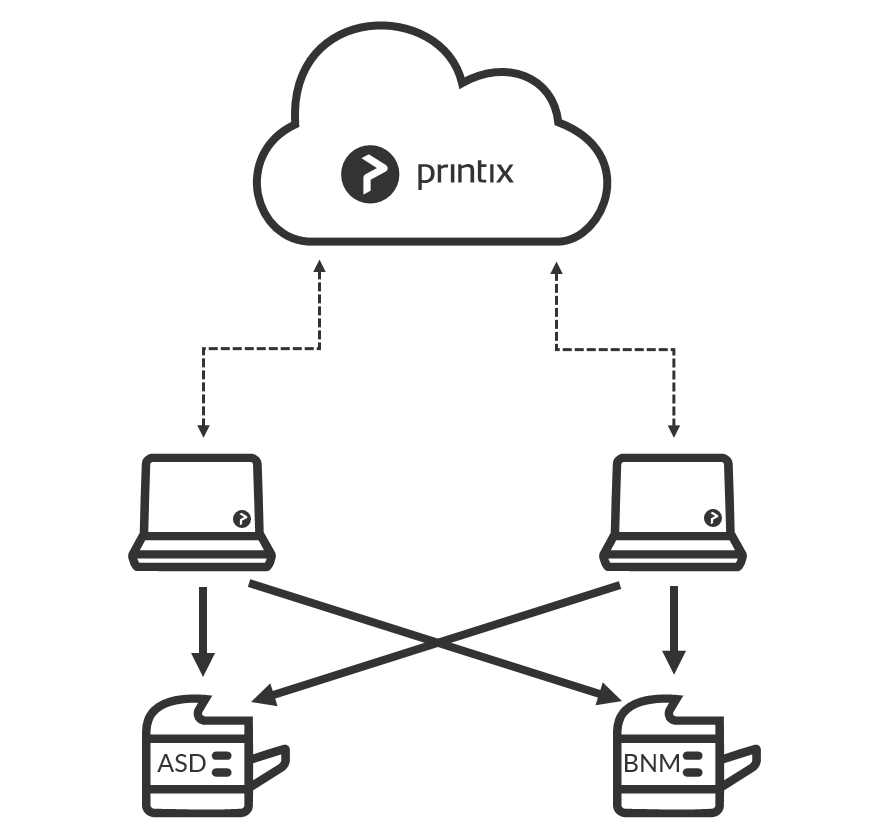
Can Printix print between separated networks?
Yes, Printix can be configured to allow users to print to printers that are on separated networks. This is achieved by allowing printing via the cloud and a Printix Client computer on the printer’s network. The document remains secure during this transfer over the Internet as the document itself and the communication are both encrypted.
Is Printix serverless?
Yes, you can remove the need for any print servers as the Printix Cloud Print Management Service handles all the data required.
However, in some cases running the Printix Client software on at least one computer that is always on, may be recommendable. Let us look at the details:
Printix Client facilitates communication between Printix Cloud and your printers
- When there is no Printix Client running on the network with your printers, our web interface, Printix Administrator, will not be able to show the latest status of these printers.
Printix Client can facilitate printing between networks and via the cloud
- When there is no Printix Client running on the network with your printers, users will not be able to print and release documents to those printers. Obviously, if the user’s computer is connected to the same network as the printer, then printing works, as the Printix Client on the user’s computer will also be running.
- If you have users and printers on two separate networks, then you can have a computer with two network adapters (LAN and WiFi) connected simultaneously, one for each network, thus have Printix Client on that computer transfer the print data to the printers.
- If you want users to be able to print, to printers on the company network, while they are at home or travelling, then you should also ensure that there is at least one online computer with Printix Client on the network with the printers.
Printix Client facilitates Active Directory authentication
- If you are using Active Directory authentication, a computer with Printix Client must be online on the network, otherwise, the on premise Active Directory server can not be contacted for authentication. This is not a requirement if you use Azure/Office 365 authentication or another of the supported cloud-based Identity Providers.
In the above situations, the computer that is on at all times is not required to run a Windows Server OS.
Here is why Printix is serverless:
- Our Printix Cloud Print Management Service handles all the data required for your serverless print infrastructure. You do not have to add and maintain additional on premise servers and databases.
- You can remove print servers.
- If you decide to have Printix Client running on one or more computers at all times, these computers are not required to run a Windows Server OS.
Is Printix secure?
Below please find various security-related information to consider when using Printix Cloud Print Management Service.
What data does Printix register?
To use Printix your company must have a Printix Home in the cloud and install Printix Client software on your computer(s). Your Printix Home is isolated from other customers and your Printix Client is preconfigured to communicate with your company’s Printix Home only.
In order to allow you to manage your printers via Printix Cloud and offer our services, Printix registers necessary information. This is typically the information you can see either directly or in a processed format in the Printix Administrator.
- Printers: Address, Vendor, Model name, Name, MAC address, Serial number, Capabilities, Page counters, Consumables data, and statistics.
- Computers: Address, Hostname, Type (Laptop, Desktop, Server), System (Windows, Mac).
- Users: Name, Email, Role. As for passwords, please see Authentication below.
- Documents: Name, Number of pages, Color, 2-sided, and where and when it was submitted, printed, and deleted.
Documents
- Documents are encrypted and stored until they expire and/or get deleted.
- Documents do not leave your network.
- Document names can only be seen by the owner of the document.
- Advanced Encryption Standard (AES) with a key length of 256 bits is used to encrypt documents.
Communication
- All Printix communication inside and outside the network is secured with encryption and the use of HTTPS (SSL/TLS). You can see information about the Network ports in the Printix Administrator Manual.
- SNMP is used to collect information from printers. Both SNMPv1 and SNMPv3 is supported.
- Print data is sent unencrypted to the printer. Please inform us if you require print data to be sent encrypted.
Printing
- Printing directly to the printer is just as secure as compared to traditional network printing.
- With Print later and Print anywhere you have the option to wait until you have arrived at the printer, and only then release the documents via your phone. No more stressful “print and sprint” to prevent others from collecting your documents from the output bin of the printer. You can read more about the print process in the Printix Administrator Manual.
Authentication
- Users are required to register and sign in to use Printix.
- With Azure authentication enabled, users’ passwords are handled entirely by Microsoft Azure AD.
- With Google authentication enabled, users’ passwords are handled entirely by Google.
- With Active Directory authentication enabled, users’ passwords are not stored by Printix, but can be transferred securely via LDAPS to the local Active Directory server for authentication.
- For users that authenticate directly with Printix, passwords are protected through salted password hashing. Users can reset a password themselves. Their email address is required for this to work. Passwords must be minimum 6 characters in length and contain uppercase letters, lowercase letters, and digits.
Authorization
- Printix uses roles to control what functions a user can perform. You can see information about Roles in Printix Administrator Manual.
- Users are notified by email when their role is changed.
Printix Network Ports?

Secure communication
All Printix communication inside and outside the network is secured with encryption and the use of HTTPS (SSL/TLS). Documents are stored encrypted until they expire and get deleted. Documents do not need to leave your network.
- HTTPS on TCP port 443
Secure browser communication between the components and Identity Providers, such as Microsoft Azure AD, Google Workspace and others.
These ports must be open within the network:
- SNMP on UDP port 161
Access and collect information from printers via SNMP. Both SNMPv1 and SNMPv3 is supported. ICMP message requests and replies must be allowed on the local network, as the ping command is used to discover printers. - RAW print on TCP port 9100
Transfer print data to the printers. The computer with Printix Client must be able to reach the printer on the network to allow printing. Print data can also be sent via: - TCP port 21335
Forward print data to another computer running Printix Client. Encrypted. - TCP port 21336
Secure communication to Printix Redirector on a Windows Server. - UDP port 21337
Printix Discovery Protocol used to find computers running Printix Client. Not encrypted. - UDP port 5353
If mobile print is enabled, and is to be used with iOS/iPadOS phones and tablets, then Printix Client will broadcast AirPrint printers via the Bonjour networking protocol (Multicast DNS).
Printix Client requires two ports to be open on the local computer:
- TCP port 21338 and 21339
Secure local communication. TCP port 21338 is used for communication between the two processes: PrintixClient.exe and PrintixService.exe. TCP port 21339 is used for listening by the Printix Client built-in web server for sign in and printing (Windows print spooler and CUPS).
If Printix Go is in use these ports must also be open within the network:
- TCP port 7627
SOAP communication from Printix Client to Printix Go on HP printers.
- TCP port 50003
SOAP communication from Printix Client to Printix Go on Konica Minolta printers.
If Active Directory authentication is enabled one of these ports must also be open within the network:
- Secure LDAPS on TCP 636
Authentication of users via secure LDAPS. - LDAP on TCP port 389
Authentication of users via LDAP.
Windows ![]() Printix Client automatically configures the required ports in the local Windows Firewall. It does so by running the provided file: open_firewall.cmd
Printix Client automatically configures the required ports in the local Windows Firewall. It does so by running the provided file: open_firewall.cmd
Web proxy and SSL inspection
Use of a web proxy and/or SSL inspection may for example prevent Sign in to Printix Client. You MUST add the printix.net domain and subdomains as exceptions so traffic is not blocked.
The syntax for adding exceptions varies depending on the software you use. Please refer to you security software documentation to determine the syntax for specifying a domain and subdomains. These are some common examples of wildcard syntax:
- *.printix.net
- .printix.net
The specific URLs that must be unblocked:
Required
- https://assets.printix.net
- https://api.printix.net
- https://auth.printix.net
- https://sign-in.printix.net
- https://drivers.printix.net
- https://software.printix.net
- wss://websocket.proxyendpoint.printix.net
Required, if you enable mobile print (Apple AirPrint)
- https://airprint.printix.net
Required for optional data extraction
- https://*.blob.core.windows.net
How does Printix Client find the web proxy?
Printix Client consists of two components:
- The user interface of Printix Client (PrintixClient.exe) which runs under the signed in user’s account
- The Printix Service (PrintixService.exe) which runs under the local system account, and handles the printing.
Printix Client use a Windows function WinHttpGetProxyForUrl (implements WPAD) to get the proxy settings from the PAC file. It also looks at the proxy settings configured for the user. If it finds a suitable set of proxy settings for the user, it remembers them in the registry under the LSA user (HKEY_USERS\S-1-5-18\Software\Microsoft\Windows\CurrentVersion\Internet Settings\Connections).
Troubleshooting
- I have a web proxy and sign in to Printix Client does not work
- I have a web proxy and my printer will not install
- I do not recognize the used web proxy
- I have disabled the web proxy, but the computer still does not act as proxy
I have a web proxy and sign in to Printix Client does not work
- Sign in with Microsoft, Google or email in Printix Client just returns to Sign in.
RESOLUTION: You MUST add the required domains (see above) as exceptions so traffic is not blocked. See also: Sign in issues.
I have a web proxy and my printer will not install
- Print drivers can not be downloaded from the Printix driver store.
RESOLUTION: Unblock the URL https://drivers.printix.net
I do not recognize the used web proxy
- In this case the PrintixService.log file will contain the text like this: running with proxy1: http://172.23.100.13:8080/ and Unable to connect to the remote server.
RESOLUTION: Check if the web proxy is part of the PAC file and if it should be updated/deleted.
I have disabled the web proxy, but the computer still does not act as proxy
- In this case, the PrintixService.log file may contain errors like: Proxy: Error event, Exception: proxy error
RESOLUTION: Follow the steps below to delete settings from Windows registry.
- Select Windows logo key + R to open Run.
- Type: regedit, and select OK.
- In Registry Editor browse to:
HKEY_USERS\S-1-5-18\Software\Microsoft\
Windows\CurrentVersion\Internet Settings\Connections
- Delete the two entries called DefaultConnectionSettings and SavedLegacySettings.
- Restart the computer.
- Sign in to Printix Client again.
Zero Trust Networks?
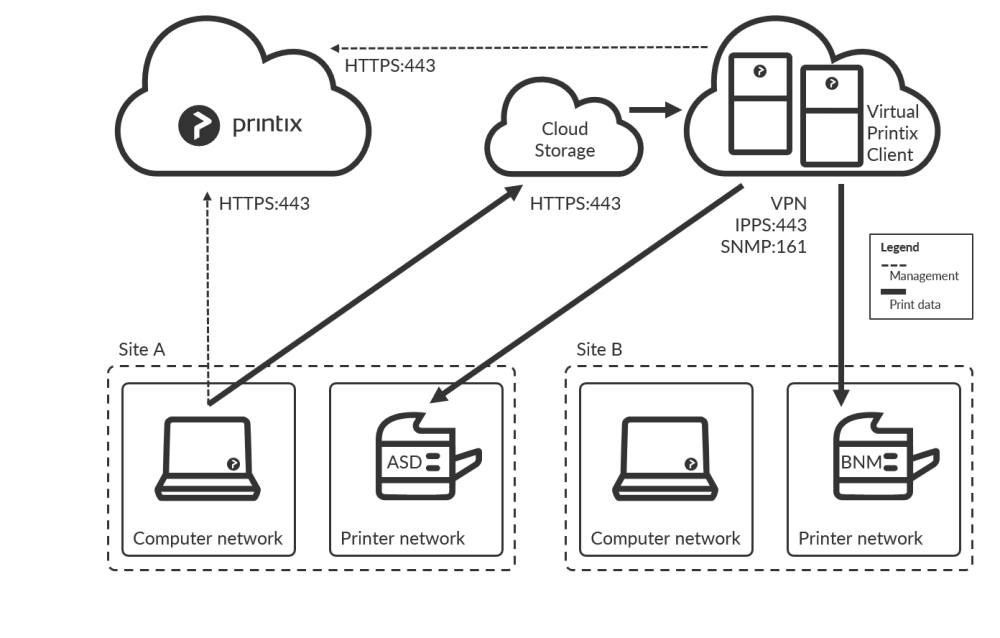
To print a document, a computer with Printix Client must be online on the same network as the printer. This may not be possible if it is required that printers and computers are kept on separate networks. To resolve this you can run a computer, preferably a server, in the cloud, for example Azure. To make the Site A printers available to the computers on the Site A separate computer network check Via the cloud and select On selected networks only and select the Site A computer network.
Printix Client is installed on the computer and the computer can route (via VPN) to the printers on the printers’ network(s). By adding the computer to the printers’ network Printix can print on those printers, even though there is no physical computer connected on the printer network. If you are concerned about resilience, you can add additional computers in the cloud.
- How to add a virtual Printix Client to a network
- How to add an additional virtual Printix Client to a network
- How to remove a virtual adapter from a computer
- Allow communication with the printers
How to add a virtual Printix Client to a network

- Identify a computer with a network interface that can route (via VPN) to all the relevant subnets (VLANs) with printers.
- Open Computer properties.
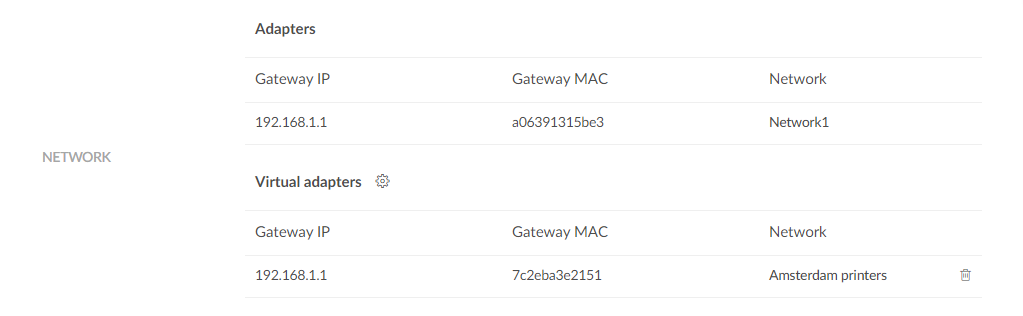
- In the Network section select Virtual adapters setup
 to open the Virtual network access menu.
 - Select Create new network.

- Enter Network name (Example: Amsterdam printers).
- Enter default Gateway IP (Example: 192.168.1.1) for the printer network. You can obtain that from any of the printers on the network:
- Open the printer’s web page and Sign in as Administrator. Look for Network information where you will find the Gateway IP.
- At the printer use the touchscreen control panel. Look for Network information where you may find the Gateway IP.
- Most printers allows you to Print network configuration. Please refer to the printer’s documentation.
- Select Save.
How to add an additional virtual Printix Client to a network
To get resilience you can add additional computers in the cloud.
- Open Computer properties.
- In the Network section select Virtual adapters setup to open the Virtual network access menu.
- Select Add to network and then select the network (Example: Amsterdam printers).
- Select Save.
How to remove a virtual adapter from a computer
- Open Computer properties.
- Identify the virtual adapter gateway (Example: Amsterdam printers).
- Select the Remove
 icon.
icon. - Check I accept and select Confirm.
- The gateway remains listed on the Network properties page.
See also:
Allow communication with the printers
These ports must be open to allow communication with the printers:
- SNMP on UDP port 161
Access and collect information from printers via SNMP. Both SNMPv1 and SNMPv3 is supported. ICMP message requests and replies must be allowed on the local network, as the ping command is used to discover printers. - RAW print on TCP port 9100
Transfer print data to the printers. The computer with Printix Client must be able to reach the printer on the network to allow printing. Print data can also be sent via LPR and TCP port 515. Use of other port numbers is also supported. Print data can also be sent via:
See also:
More information about Print drivers?
Printix maintains a global driver store with Windows and macOS print drivers. When users start to use Printix Client, it will automatically upload print drivers and put them in your Printix driver store. If there is no dedicated print driver for a particular printer, then an appropriate Universal print driver may be used.
Printix Client for Mac uses Apple’s Generic PostScript Printer and Generic PCL Printer if there is no dedicated or Universal print driver.
You may wish to add a print driver to your Printix driver store to deal with these scenarios:
- Newly released printer
The printer is just released and therefore the print driver is not among the print drivers in the driver store.
- Selected print driver lacks features
The selected print driver (perhaps a universal/generic print driver) does not fully support the features of the printer.
- Selected print driver lacks language support
The selected print driver does not support the language required. Some Asian countries for example may require special print driver packages for language support.
- No print driver was selected for the printer
If the printer does not support PostScript, PCL6 or PCL5, then a Universal print driver is not available, and you have to use a dedicated print driver from the printer vendor.
See also:
More about understanding networks?
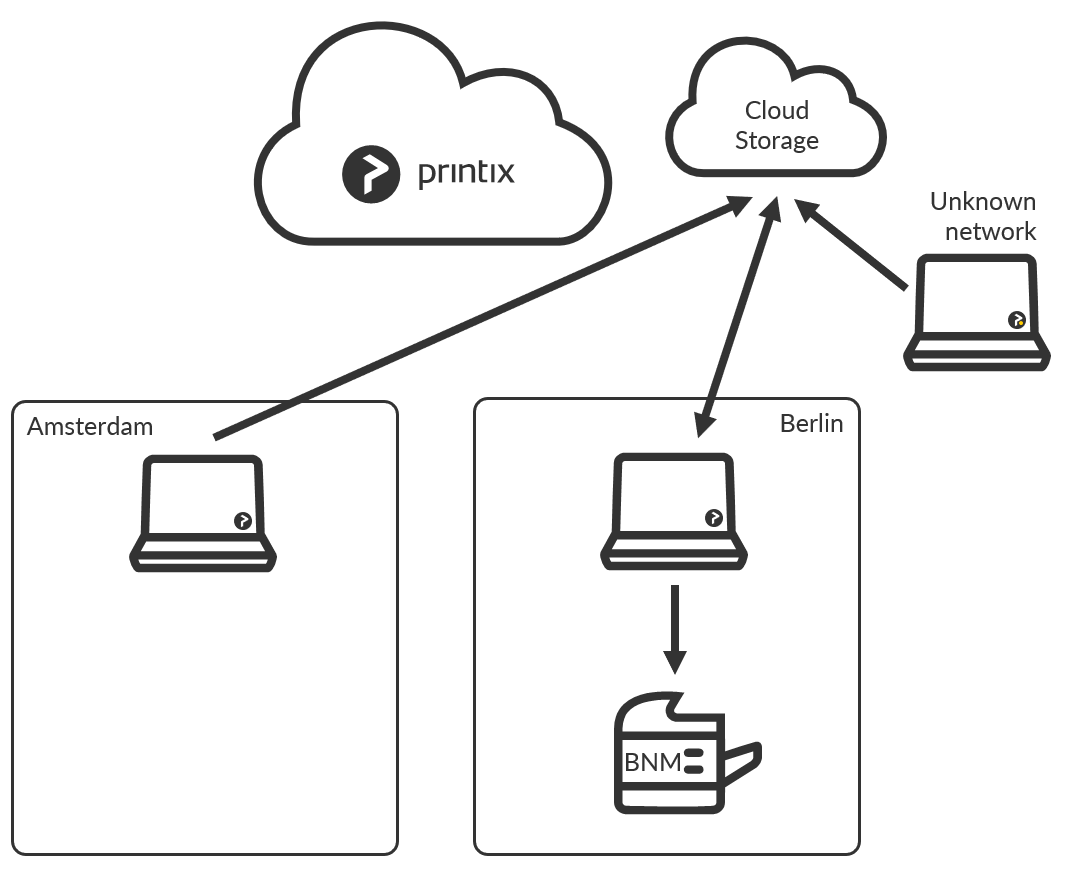
Consider a company with two sites (Amsterdam and Berlin) with separate networks. There is no routing between the two, that is, from Amsterdam you cannot reach (ping) a printer in Berlin and vice versa.
Teach Printix about networks so it can filter what printers are available to users. A user while at the Amsterdam site will only be presented to printers on this site.
You can optionally allow users to print between networks and print while their computer is on an unknown network, for example during travel or while at home.
- How to work with networks
- About networks
- Example: Company with sites in Amsterdam and Berlin
- User printing while on company network
- User printing while on unknown network
- Bridging two known networks
- Cloud storage
- Printer availability
How to work with networks

- How to add a network
- How to modify network name
- How to add an unknown network to a network
- How to add a gateway to a network
- How to delete a gateway from a network
- How to merge networks
- How to enable printing via the cloud
About networks
- You can name networks to reflect the name of company sites or branches (Amsterdam, Berlin, …).
- The first network is named Network1.
- A network is defined by a collection of one or more Gateways (identified by their IP address and MAC address).
- A gateway should only be added to a network if routing is possible to the other computers/printers on that network.
- To test, verify you can ping printers/computers on the network.
- A computer is considered to be on the network the gateway is part of.
- A computer can be on multiple networks – one for each active network adapter (LAN and Wi-Fi).
- A computer that uses a gateway that is not part of a network will appear as being on an Unknown network and a yellow dot is shown on the Printix Client icon

- A computer (laptop and hybrid tablet like the Microsoft Surface 3 or later) will appear as being on an Unknown network when it is powered-on outside a named network, for example at home or during travel.
- A printer is automatically added to the network you select, when you use:
Example: Company with sites in Amsterdam and Berlin
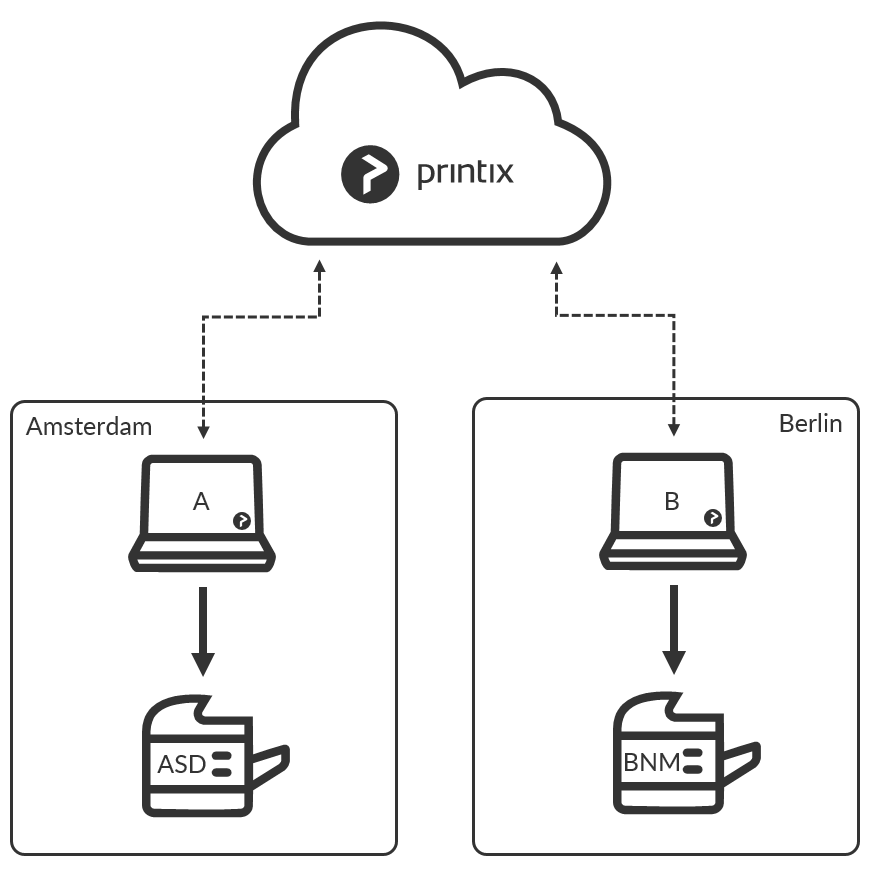
- As you first deploy Printix Client in Amsterdam on computer A and discover printer ASD these will be recorded as being on the network named: Network1.
- You can modify the network name to change it from Network1 to Amsterdam.
- When you deploy Printix Client in Berlin on computer B it will appear as being on an Unknown network due to the unknown gateway.
- On the Networks page you can add a network, name it Berlin, and then add the relevant Unknown network to the Berlin network. By adding networks, you are teaching the system about your company’s networks. With the new knowledge, the system will attempt to automatically assign computers to the right company network in the future.
- Use Discover printers, select the Berlin network to add the printer BNM.
- An employee who brings a laptop from Amsterdam to Berlin will not have to change anything, as the laptop will automatically be reassigned to the Berlin network.
- Any of the print queues on the Berlin network, which has Add print queue automatically checked, are added automatically on the employee’s computer.
- Existing printers, including those added in Amsterdam, will appear as offline on the computer.
- When the employee travels back, the laptop is automatically reassigned to the Amsterdam network. If any of the Berlin print queues, which has Remove print queue automatically checked, are removed automatically from the employee’s computer.
- During travel and at the employee’s home the laptop will appear as being on an Unknown network.
- An employee who brings a laptop from Amsterdam to Berlin will not have to change anything, as the laptop will automatically be reassigned to the Berlin network.
Print between networks
Printing is achieved via Printix Cloud and a Printix Client computer on the printer’s network. At least one of the Printix Client computers on the printer’s network should have permanent network access. The document remains secure during the transfer over the Internet as the document itself and the communication are both encrypted.
- Enable printing via the cloud for printer BNM in Berlin.
User printing while on company network
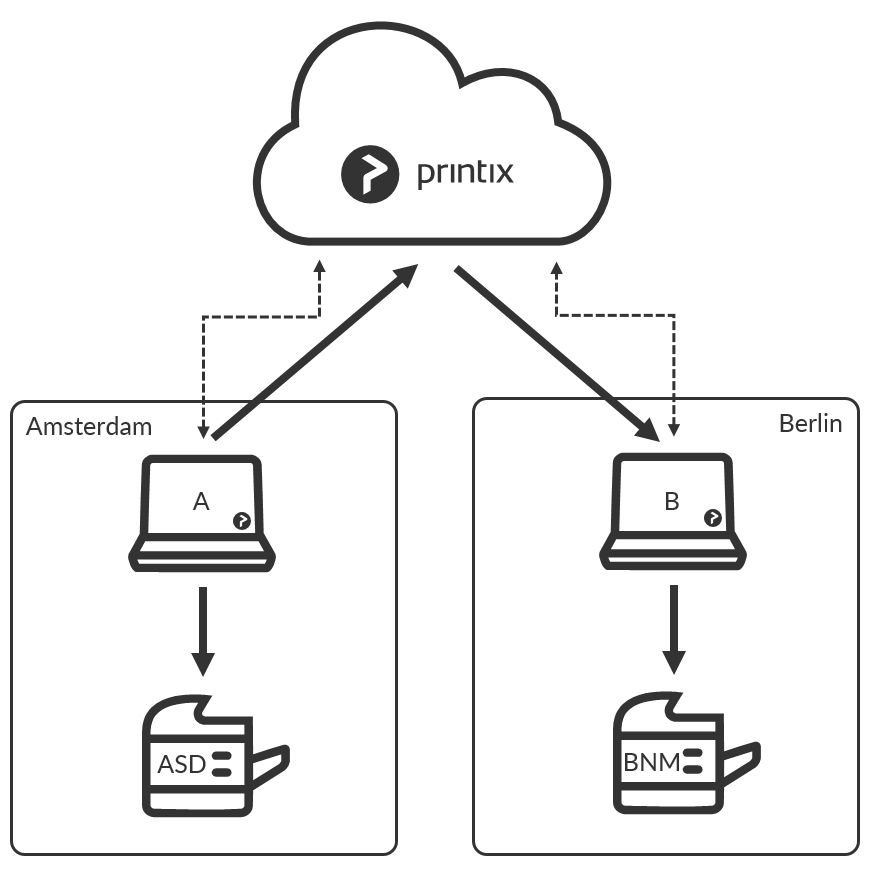
- The user on computer A in Amsterdam can now add the BNM printer and print to this even though it is in Berlin.
User printing while on unknown network
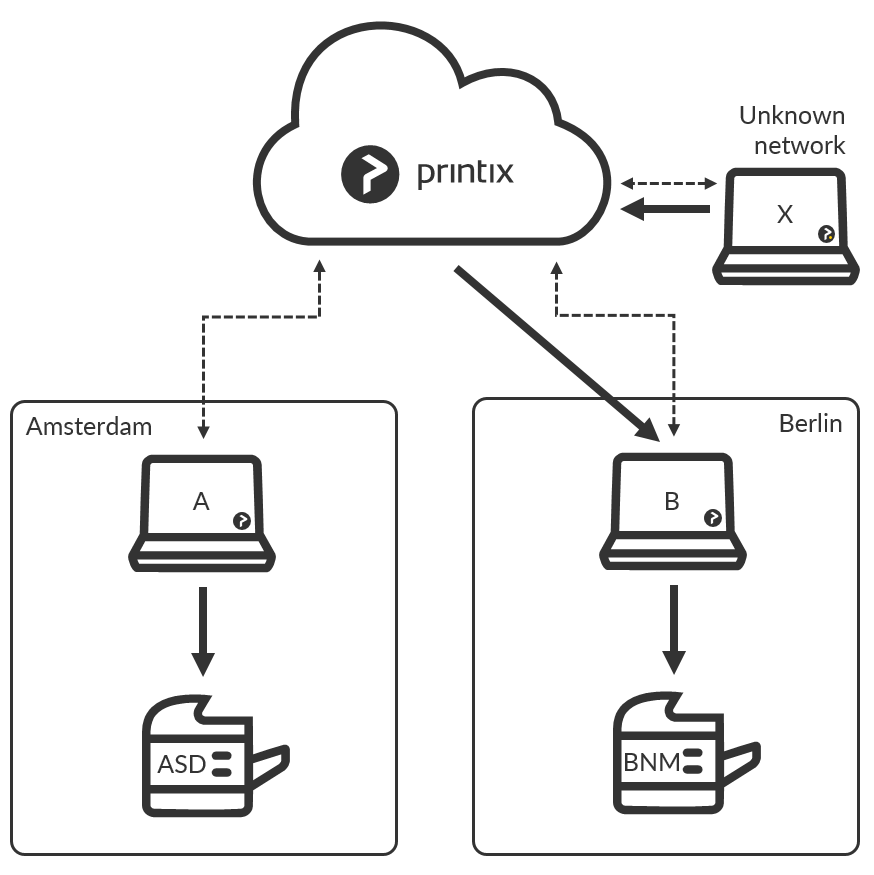
- A user working on computer X at home or while travelling, can print directly and release documents to the printer BNM.
Bridging two known networks
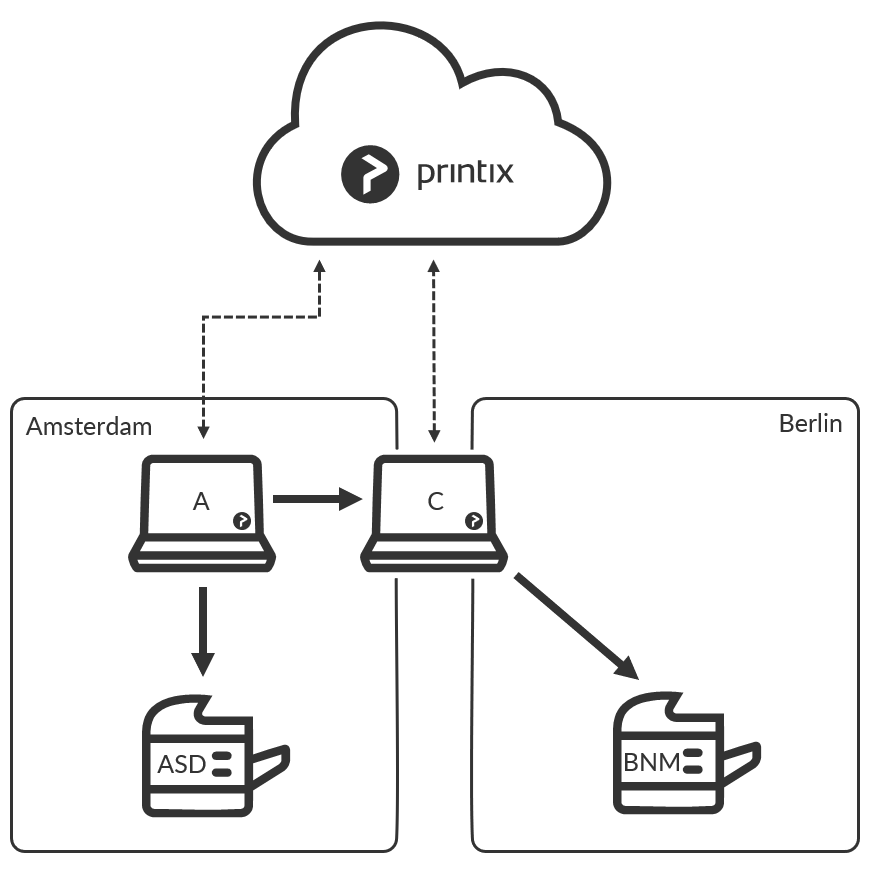
If you have a computer C with two network adapters, and it is on both the Amsterdam and Berlin network at the same time, then print data from computer A to printer BNM are automatically forwarded via this instead of via the cloud. Computer C should have permanent network access.
Cloud storage
If you Add cloud storage, documents printed Via the cloud will go via your cloud storage, rather than the Printix Cloud. In addition you can enable storage of pending documents in your secure cloud storage.
See also:
Printer availability
Based on the network, Printix Client filters the list of printers you can add. If in Amsterdam you will see printers on the Amsterdam network. Regardless of the network, the list will always include:
- Printix Anywhere printer(s).
- Printers with Via the cloud checked.
| ASD | BNM | Anywhere | |
|---|---|---|---|
| Computer A (Amsterdam) | + | + | + |
| Computer B (Berlin) | – | + | + |
| Computer C (Both networks) | + | + | + |
| Computer X (Unknown network) | – | +1 | +2 |
+1 While the computer is on an Unknown network it is possible to print directly and release print later documents to the printer BNM.
+2 While the computer is on an Unknown network it is possible to release print anywhere documents to the printer BNM.
More information about Printix Requirements?
The requirements are grouped as follows:
More about Printix Implementation Guide?
To guide you through the implementation of our Printix Cloud Print Management Service, we suggest you consider the below phases and examples.
- Implementation phases
Evaluation, Proof of Concept, Implementation, and Go live- Printix Implementation Manual
- Infrastructure implementation
- Additional functionality implementation
- Implementation setup
- Implementation pack
An assigned expert will assist with the technical setup associated with Printix software.
Implementation phases
- Evaluation
Start a trial and familiarize yourself with the product through hands-on experience and by trying relevant features. - Proof of Concept
Proceed to do more hands-on, perhaps involving the installation on a print server. - Implementation
- Deploy Printix Client.
- Identify and name networks.
- Discover printers.
- Convert print queues.
- Go live.
Printix Implementation Manual
- Printix Implementation Manual
Describes how to implement Printix.

Infrastructure implementation

Additional functionality implementation

Implementation setup
To select the Implementation setup, we recommend you make these changes to the configuration:
- On the Settings
 page:
page:
- Enable print later is unchecked.
- Allow users to add printers via Printix Client is unchecked.
- Print queue naming is set to Printer name without printer ID.
- Create default print queue is unchecked.
- Convert print queues is unchecked.

- On the Printix Anywhere printer’s Print queue properties page:
- Add print queue automatically is unchecked.
- Active is unchecked.

Implementation pack
Our Printix Implementation Pack is designed for customers who want:
- Priority Implementation Support up to 2 hours and
- 12 months Priority Support and Technical Assistance
For two hours, within the first 90 days from the start of your Printix subscription service, an assigned expert will assist with the technical setup associated with Printix software.
More about Citrix and RDS?
Printix printing is also possible if you use Citrix or Remote Desktop Services (RDS).
- Install Printix Client on the Citrix Servers and install Printix Client on at least one computer at each site/location.
- Add networks to reflect the sites/locations.
- For each print queue in Printix Administrator open the Print queue properties page and check Via the cloud.
- Each user running a terminal session (Citrix session) will Sign in to Printix Client and see all the printers for the site/location.
Alternatively, if you are using “fat” clients:
- Install Printix Client on each client.
- All the local printers will be mapped into the Citrix terminal session.
Deploying images with Printix Client
If you intend to copy an image with an installed Printix Client to another Citrix or RDS server, then you must ensure that no user has signed in to Printix Client.
Each computer with Printix Client is, once a user has signed in, registered in Printix Cloud with a unique ID, and it is also at this time the computer will appear in Printix Administrator. The ID is written in the Windows Registry:
HKEY_LOCAL_MACHINE\SOFTWARE\
printix.net\Printix Client\WS\WSId
If an image is produced after a user has signed in, and subsequently installed on another computer, then there will be an undesired condition where these computers will have the same WSId. This will result in the computers fighting for connection and they will try to update the same computer properties in Printix Cloud. To resolve the issue you need to make an image, where no computer (WSid) has been registered. Before you start to use the new image, you need to delete the computer in Printix Administrator. After a short time, the computers will register and appear in Printix Administrator.
How to produce an image without the trace of previously registered computers (WSid)
- Open Task Manager
- Select the Details tab.
- Select PrintixClient.exe and select End task. Select End process.
- Select PrintixService.exe and select End task. Select End process.
- In Registry Editor browse to:
HKEY_LOCAL_MACHINE\SOFTWARE\
printix.net\Printix Client\
- Delete the Printix Client folders:
- \RT
- \WS
- Verify that these folders are still there:
- \CurrentVersion
- \Printers
- \Tenant
- \Users
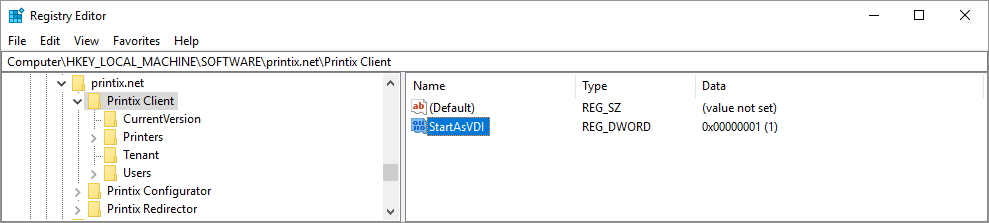
- In the Printix Client folder add the DWORD value name StartAsVDI.
The StartAsVDI can take on these Decimal values (hex value in parenthesis):- 0 (0×00000000)
This is the default. Printix Client will update itself automatically. - 1 (0×00000001)
Printix Client will NOT update itself automatically. It will read and write the user’s Printix settings, including access tokens, in the user’s Application Data folder.- The path to the users application folder is based on
%APPDATA%.
- The path to the users application folder is based on
- 2 (0×00000002)
Printix Client will update itself automatically. It will read and write the user’s Printix settings, including access tokens, in the user’s Application Data folder.- The path to the users application folder is based on
%APPDATA%.
- The path to the users application folder is based on
- 999 (0×000003e7)
Printix Client will NOT update itself automatically. It will read and write the user’s Printix settings, including access tokens, in the user’s Application Data folder.- The path to the user’s application folder is based on
%USERPROFILE%and thenAppData\Roamingis appended.
- The path to the user’s application folder is based on
- 0 (0×00000000)
- In the Printix Client folder add the DWORD value name useGroupPermissions.
It can take on these Decimal values (hex value in parenthesis):- 0 (0×00000000)
This is the default. Printix Client will make all installed print queues available to the signed in user. - 1 (0×00000001)
Printix Client will look at the users’ group membership and only make print queues with Exclusive access available to the signed in user. This is done by setting the security permissions on the print queues accordingly.
- 0 (0×00000000)
- Produce the image.
Citrix Profile Management
To make Printix Client work, you need to modify Windows Registry so user’s Printix settings are included in the Application Data roaming profile.
- Select Windows logo key + R to open Run.
- Type: regedit, and select OK.
- In Registry Editor browse to:
HKEY_LOCAL_MACHINE\SOFTWARE\
printix.net\Printix Client\ - Add the DWORD value name StartAsVDI and give it the value that match your environment (see above).
How to see the value of APPDATA
- Open a command prompt and type:
echo %APPDATA%- Normally this will give the result:
C:\Users\ username \AppData\Roaming
Example: C:\Users\John\AppData\Roaming - If the AppData folder is redirected this will give the result:
\\ servername \ folder Redirect$\ username \Application Data
Example: \\myserver.acme.com\myfolderRedirect$\John\Application Data
- Normally this will give the result:
The below is the example of the Printix relevant path and subfolders that must be included in the roaming profile.
- %APPDATA%\printix
Example: \\myserver.acme.com\myfolderRedirect$\John\Application Data\printix
Printix and Universal Print by Microsoft?

Printix integrates with Universal Print by Microsoft and runs on Microsoft Azure.
Requirements
- Microsoft Azure AD.
- An active Universal Print subscription for the same Microsoft Azure AD.
- User’s computer is running Windows 10 version 1903 or later and is either:
Limitations
- There is support for one, but not multiple Azure AD directories.
- Only one print queue per printer can be published with Universal Print.
- Documents submitted via Universal Print are tracked as 1 page documents.
- Status of jobs is Cancelled instead of Completed due to limitation in Microsoft Graph API.
Features
Enhance your print management capabilities and print experience with Printix flexible printing:
- Secure print
Release documents from your phone with Printix App or from the touchscreen control panel of a printer that has Printix Go installed.
- Mobile print
Print from phones and tablets, Android and iOS/iPadOS, to Printix managed printers
Additionally Printix provides:
- Wide operating system support:
- Direct IP printing – Keep documents local and print when there is no Internet connection.
- Central print queue and print driver management with driver store in the cloud.
- Delegated print management.
- Analytics and reports (Microsoft Power BI).
Secure print
Release documents from your phone with Printix App or from the touchscreen control panel of a printer that has Printix Go installed.
- Printix Anywhere printer
If you publish and share a Printix Anywhere print queue you can print securely with Universal Print and Printix.- Your submitted document goes to the Microsoft Cloud.
- Printix Cloud is notified about your pending document.
- You can subsequently release the document to any Printix managed printer. The printer must have a print queue that has Via the cloud checked.
- Wait until you are at the printer and then use Printix App on your phone to release your documents. Printix App is available as a native app for Android and iOS/iPadOS phones and tablets, and as a web app that runs in a web browser on your phone, tablet and computer.
- If Printix Go is installed on the printer, then you can sign in with card or ID code and release documents from the touchscreen control panel of the printer.
- Other Printix printers (ASD, BNM, …)
Documents will print directly, unless All users must print securely is checked or you are a member of a Must print securely group.- Your submitted document goes to the Microsoft Cloud.
- Printix Cloud is notified about your pending document.
- If the document must be printed securely you can subsequently release the document at the particular printer.
- Wait until you are at the printer and then use Printix App on your phone to release your documents. Printix App is available as a native app for Android and iOS/iPadOS phones and tablets, and as a web app that runs in a web browser on your phone, tablet and computer.
- If Printix Go is installed on the printer, then you can sign in with card or ID code and release documents from the touchscreen control panel of the printer.
Mobile print
Print from phones and tablets, Android and iOS/iPadOS, to Printix managed printers enabled for mobile print.
How to integrate with Universal Print
Accept integration with Universal Print

This has to be done once only and by the global admin in Azure AD.
- In Printix Administrator on the Authentication
 page select the Azure AD tab.
One directory only is supported. - For now it is requirement that Synchronize groups must also be accepted.
- For Integrate with Universal Print select Accept.
- On the Microsoft Sign in page:
- An active Universal Print subscription is required.
- Enter your printer administrator account. You must have the role as Printer Administrator to manage all aspects of printers in Universal Print.
- Enter Password.
- Select Sign in.
- Printix will ask you for permission to:
- Read and write print jobs.
- Read and write printer shares.
- Register, read, update, and unregister printers.
- Sign in and read user profile.
- Read, write and update print task definitions.
- Read and update printers.
- Read and write the properties and attributes of users’ printers.
- Read printers.
- Read the metadata and payload of users’ print jobs.
- Read and write the properties and attributes of printers.

- Select Accept to grant these permissions.
Publish print queues with Universal Print

Once you have accepted integration with Universal Print, you can proceed to publish print queues with Universal Print.
- In Printix Administrator open the Print queue properties page.
- It is possible to modify the properties of multiple print queues.
- Check Publish with Universal Print.
- The name of the print queue MUST be unique within Printix.
- There must NOT be a printer share with the same name in Universal Print.
- It is NOT possible to change the print queue name after the print queue has been published.
- If you unpublish the print queue the corresponding printer share is deleted in Universal Print.
- Select Save.
- Allow 1-2 minutes before the corresponding printer is added and the print queue is created as a printer share in Universal Print.
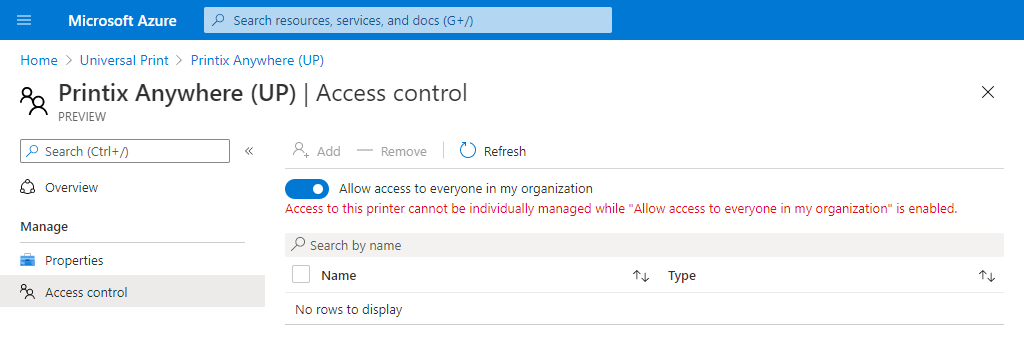
- The name of the printer share will contain (UP), which is short for Universal Print. Example: Printix Anywhere (UP)
- If the print queue has Exclusive access checked in Printix Administrator, this information is carried through to Universal Print and reflected on the printer share’s Access control settings. Otherwise Allow access to everyone in my organization is checked for the printer share in Universal Print.
Print queue naming

Native Printix managed print queue:
- Name can not be changed but is managed from Printix Administrator. Examples: Reception ASD, ASD Reception, and Reception.
- Port is an Internet Port. Example: http://localhost:21339/ipp/ASD/2114d3f3-e5732…
Printix print queue published with Universal Print:
- Name can not be changed once it is published. It will contain (UP), which is short for Universal Print. Examples: Printix Anywhere (UP), and Reception (UP).
- Port is an IPP Port. Example: IPP-eb47d31e-16f1-42f3-818s-f74a30c5…
- Driver and Model are Universal Print Class Driver.
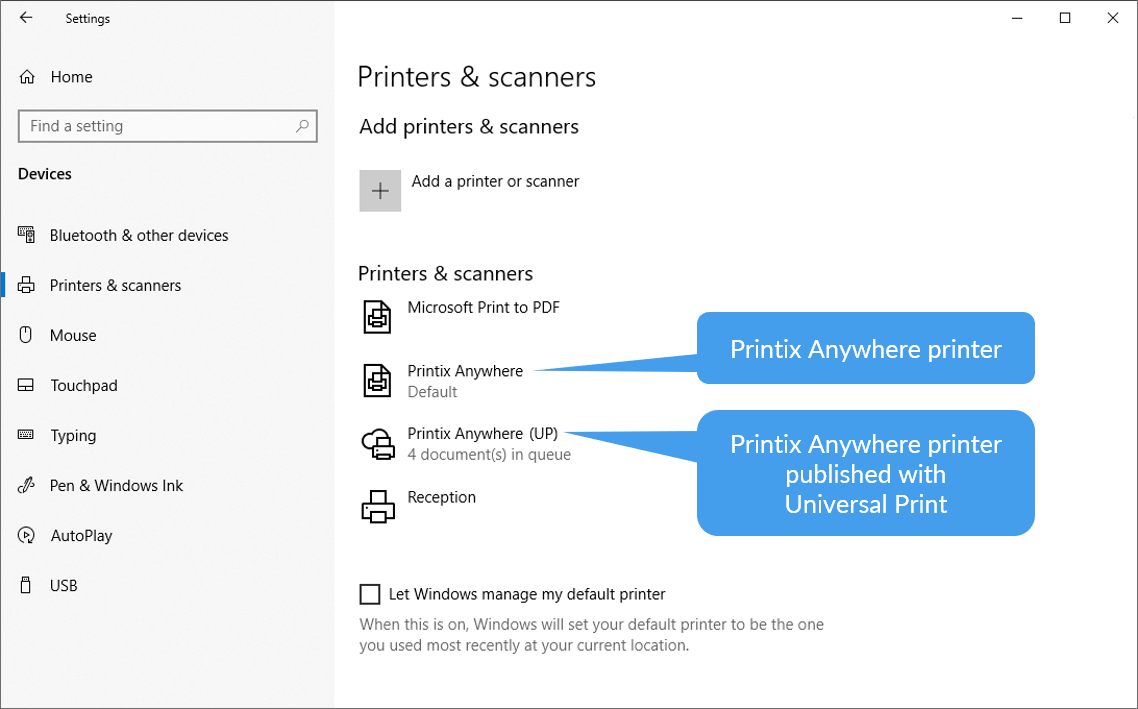
In the Windows Add printer dialog any Universal Print printer appears as a Cloud printer.

In the Windows Printers & Scanners dialog the Universal Print printers appears with a distinct cloud icon.
How to see Printix printers in Universal Print
Optionally see the printer share in Universal Print.
- Open a new browser window and sign in to Microsoft Azure (portal.azure.com), using your work account credentials.
- Select All Services, scroll to Management + governance and select Universal Print.
- On the Universal Print blade, select Printer Shares.
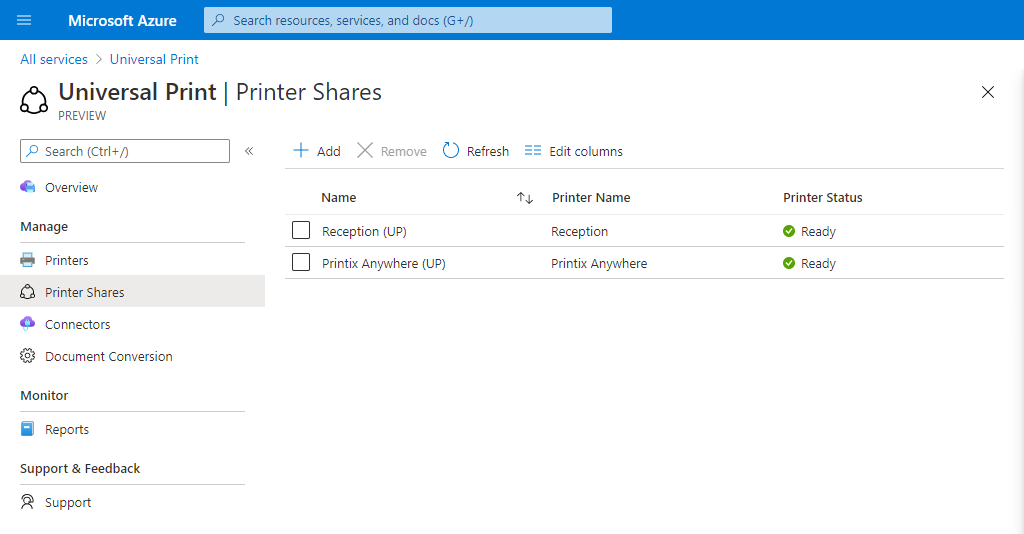
- Select the printer share. Example: Printix Anywhere (UP)
- Select Access control.
How to see print jobs in Universal Print
- On the Universal Print blade, select Printers.
- Select the printer. Example: Printix Anywhere
- Select Jobs.

How to revoke the integration with Universal Print
- Uncheck Publish with Universal Print for all the print queues that has been published.
- The corresponding printer shares are deleted in Universal Print.
- Open a new browser window and sign in to Microsoft Azure (portal.azure.com), using your work account credentials.
- Select All Services, scroll to Identity and select Azure Active Directory.
- On the Azure Active Directory blade, select Enterprise applications.
- On the Enterprise applications blade, select Printix Universal Print.
- Select Properties.
- Select Delete.
Where to find Printix Product Support?

In Product Support, you can search for information and explore the sections:
- Changelog
- Videos
- FAQ
If you Sign in you can:
- Select Follow and be notified/alerted by email when there are new articles in for example these sections:
- Announcements
If we have scheduled maintenance or issues with access to Printix Cloud, this will be announced here. - Changelog
When we release new versions a new changelog will be posted here.
- Announcements
- Submit a request. Remember to include your organization’s tenant name (Example: acme.printix.net).
- See My activities in the form of:
- Requests
Any support request you have submitted or are CC’ed on. - Contributions
Comments you have made to articles. - Following
Articles, such as the Changelog, you are following.
- Requests

How to subscribe to announcements?
- Sign in to Product Support (support.printix.net).
- Select Changelog and then Announcements
- Select Follow and be notified/alerted by email when there is a new announcement.
- If we have scheduled maintenance or issues with access to Printix Cloud, this will be announced here.
- To be notified whenever there is an update to an announcement, for example, that it is resolved, then open the specific announcement and select Follow.
How to subscribe to changelogs?

- Sign in to Product Support (support.printix.net).
- Select Changelog and then Changelogs.
- Select Follow and be notified/alerted by email when there is a new changelog.
- To be notified whenever there is an update to a changelog, for example, a new Known issue, then open the specific changelog and select Follow.
Get started with Printix for Free
Test drive your complete cloud-managed print infrastructure and secure printing environment. Full feature access. No credit card required.